i-Neighbour Web Updates
1. New Invitation Mailer
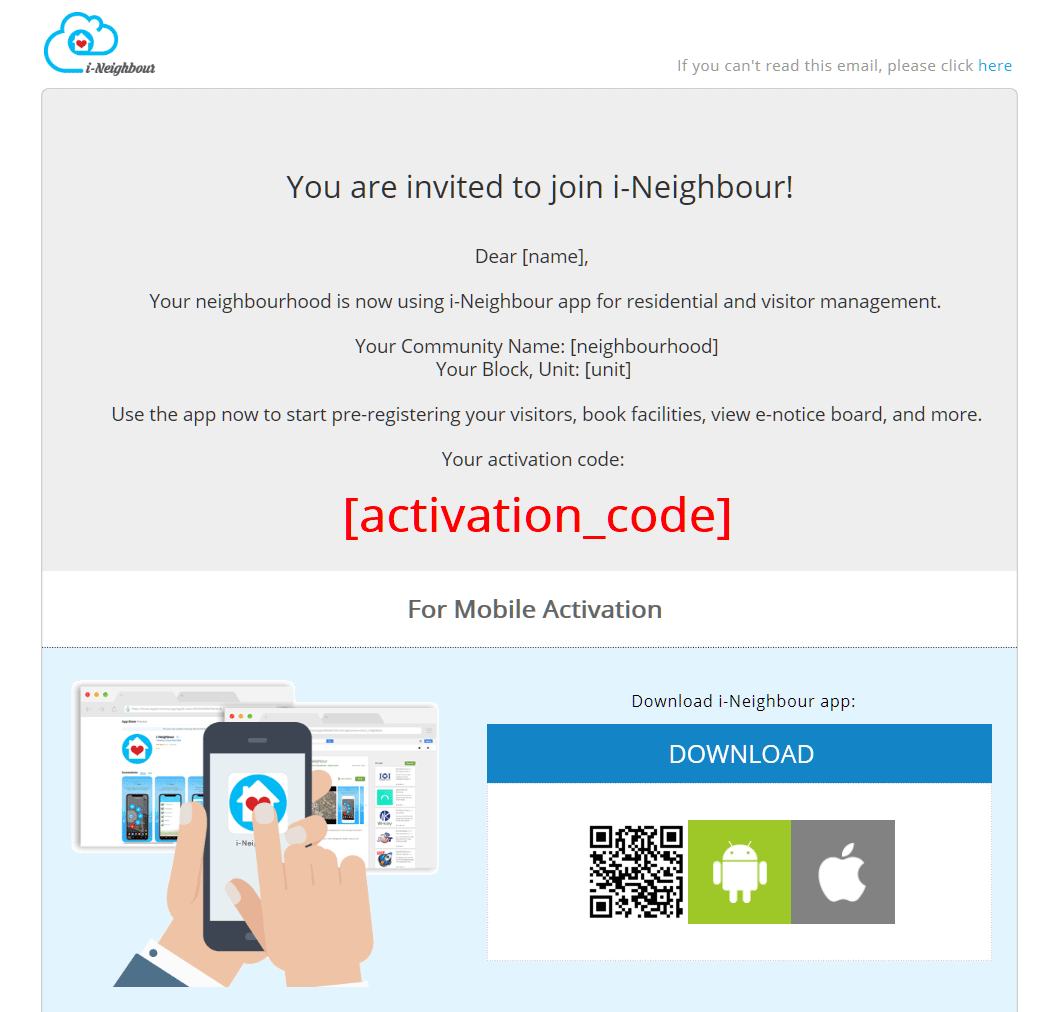
All residents will receive an i-Neighbour Invitation Mailer attached with a unique activation code that pertains only to themselves. This code is required in order to login into the i-Neighbour app. Residents who receive an activation code can proceed to register themselves as an user and access to various modules that i-Neighbour offers such as E-Billing, Announcement, Facility Booking, Visitor Invitation and more.
In this latest update, i-Neighbour has improved the UI of the resident invitation mailer. |
| a. A sample of the latest resident invitation mailer. |
 |
2. New Invoice Layout Setting with JomPay
The E-Billing feature is one of the many highlights of our i-Neighbour solution. It provides great convenience to residents who wish to make remote payment and receive up-to-date invoices balance that were uploaded by the neighbourhood admins.
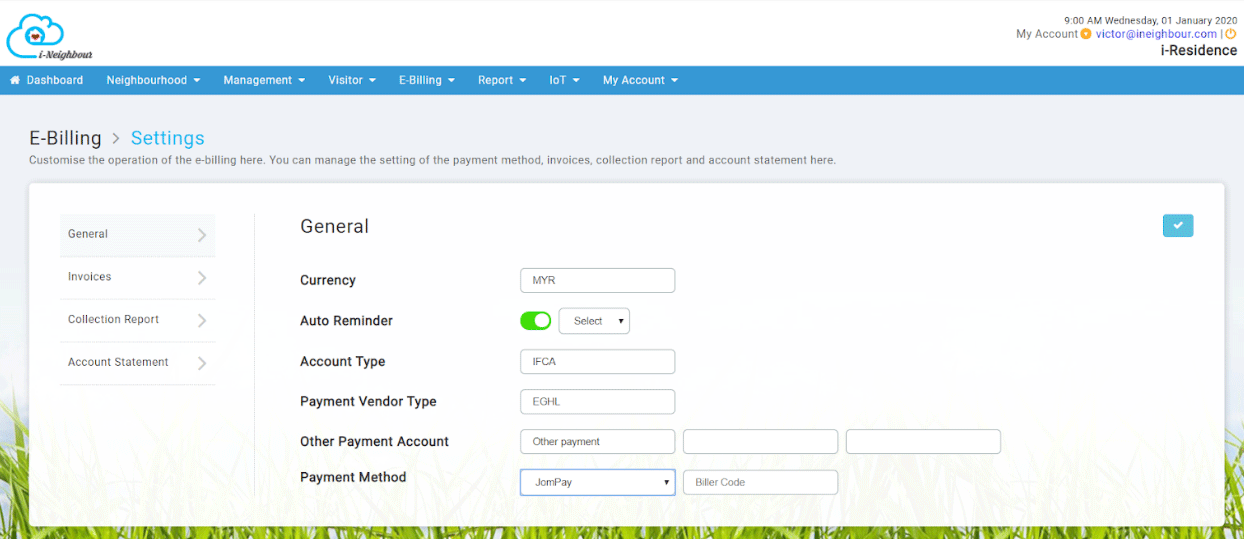
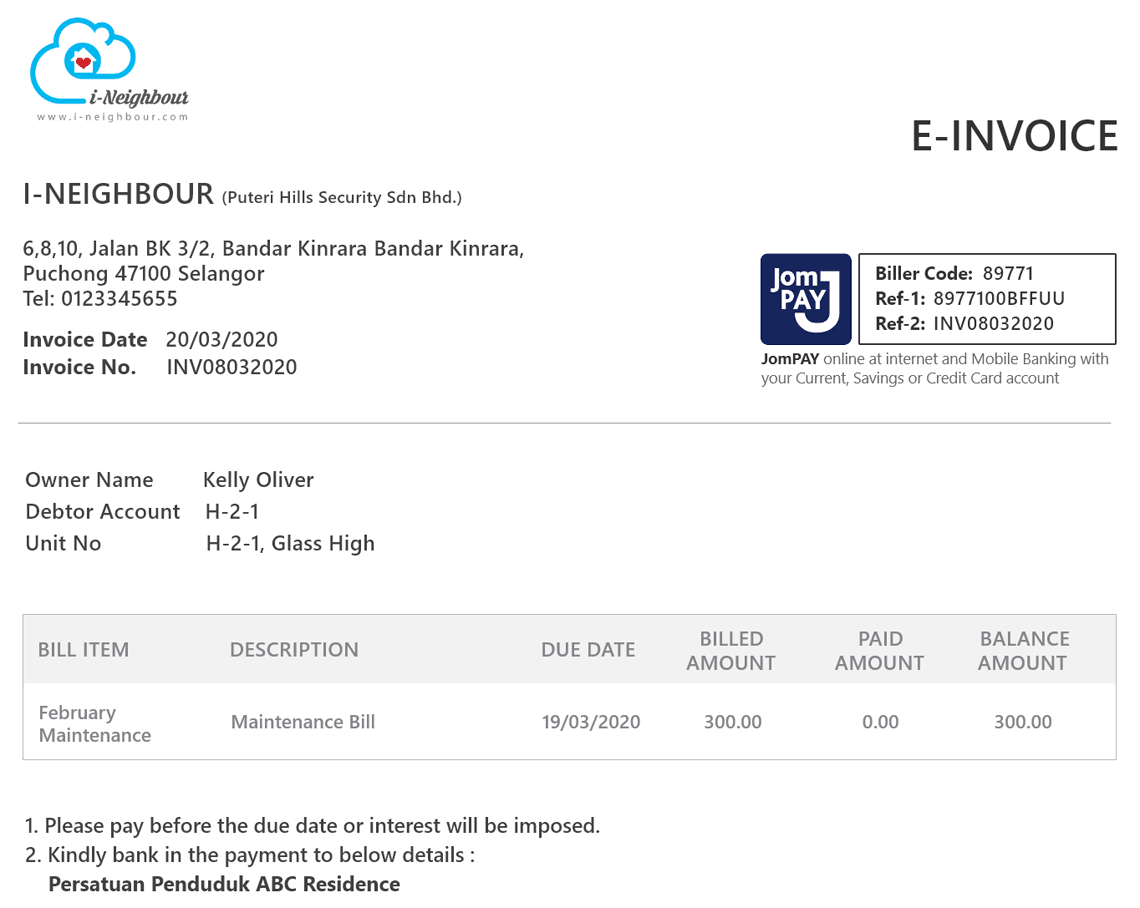
In this latest enhancement, i-Neighbour has added the JomPay payment option for all neighbourhoods as another alternative of existing payment methods. Admin can enable this by updating the biller code and reference number from the JomPay into the invoices. |
| a. The added the JomPay Payment Method setting and Biller Code field. |
 |
| b. If the JomPay Payment Method has been enabled, i-Neighbour will then include the JomPay Biller Code and Ref. into the invoice. |
 |
3. Defect Rectification Notification and Progress Update Attachment
i-Neighbour Defect Module centralises the communication not just between the Developer and Resident, but also with contractors as well. In order to keep track of the defect and rectification progress, both Admin and the Contractor can make use of the Defect Module to keep house owners posted on the rectification work.
In this latest update, i-Neighbour has added two new enhancements for the Defect Module.
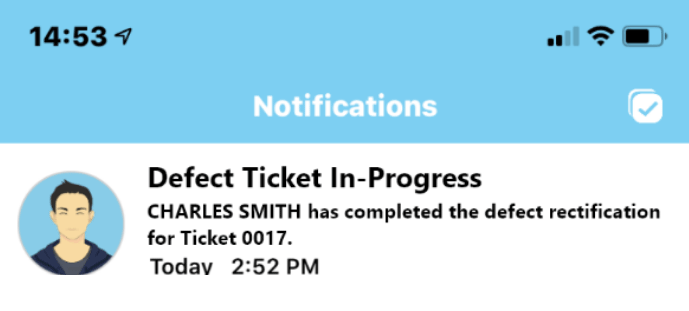
- Added notification for the Admin whenever the Contractors change the status of a Defect Ticket from progressing to completed.
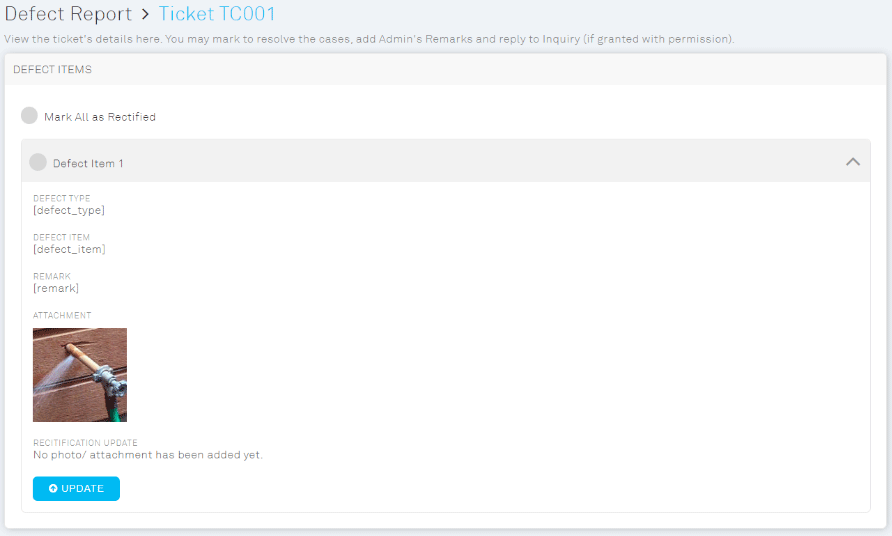
- Allow the Admin to update photos of the work progress when performing rectification.
|
| 1. A sample UI of an admin receiving a notification once the contractor has completed the rectification task. |
 |
| 2. A Sample UI of a Defect Ticket with the option to add Rectification Update. |
 |
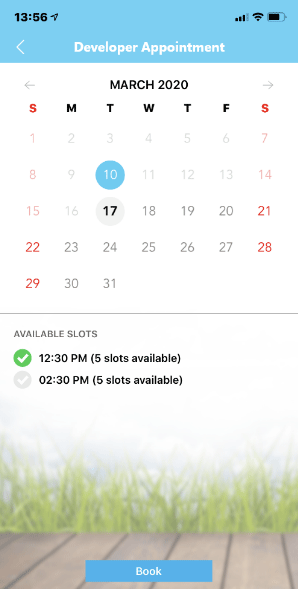
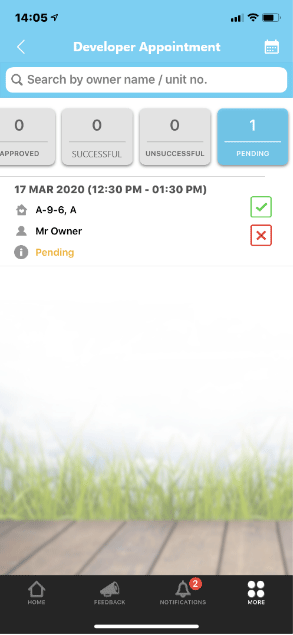
4. Developer Appointment Module
|
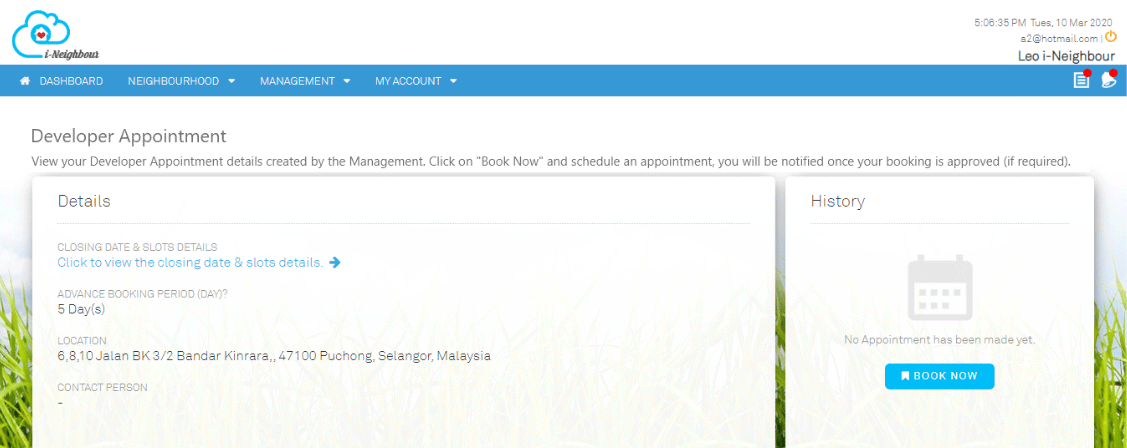
The Developer Appointment Module is a brand new i-Neighbour module that aims at benefiting housing developers and house buyers. i-Neighbour has released a new appointment module for developers to utilise i-Neighbour Calendar feature to cater various scenarios whereby the house buyers can schedule an appointment to manage any issues related to their purchased unit. Developers can easily distinguish between Key Collection, Joint Inspection and Developer Appointments marked on the Calendar.
|
| a. Residents can schedule an appointment with the Developer by clicking the Book Now button. |
 |
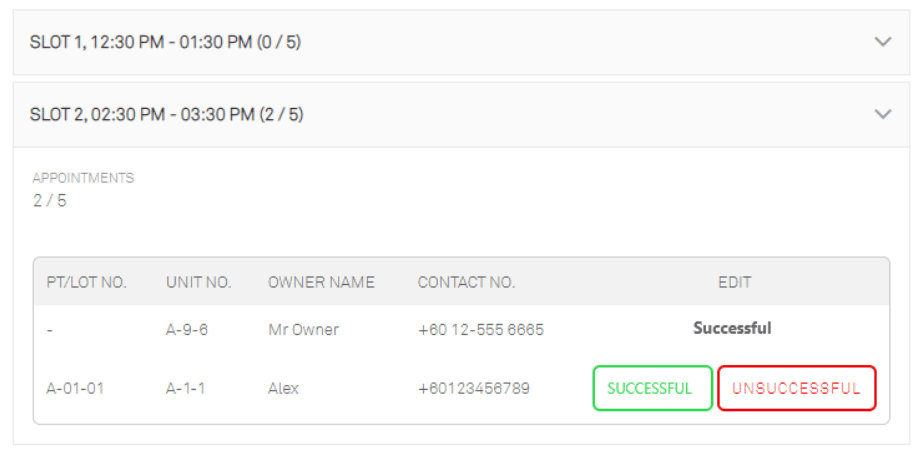
| b. Developers who have approved the appointments can monitor the status of each appointment within the Calendar details and update its status respectively. |
 |
i-Neighbour Mobile App Updates
1. Developer Appointment Module
|
Similar to the i-Neighbour Web, developers and residents can also access the developer appointment module via the i-Neighbour app. Residents can select a slot from the predetermined slots and days by the developers and schedule an appointment. Once the developer has accepted the appointment request, the resident will then receive a notification in regard to the latest update. |
| a. Residents can select a slot from the Calendar and schedule an appointment with the developer. |
|
|
| b. Developers will be able to view all the pending developer appointment requests in the Pending tab. |
|
|
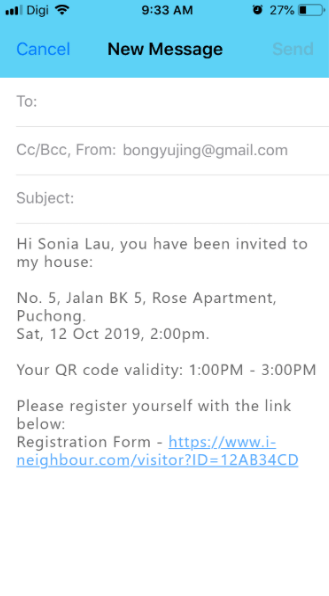
2. Simplifying the Invitation Message
The Invitation module aims at providing a smoother visitation experience for all visitors while safeguarding the neighbourhood security with a proper visitor guideline during their registration.
In this latest update, i-Neighbour has updated and simplified the visitor invitation message for residents. |
| a. i-Neighbour has simplified the Invitation Message for residents to send to their visitors. |
|
|
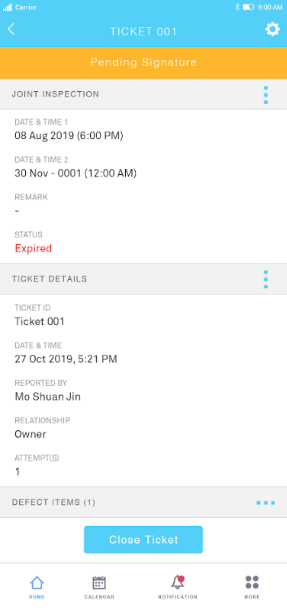
3. UI Enhancement for Defect Ticket Closing.
House buyers who have previously reported defects within their unit will be kept posted on the rectification progress. Upon completion, developers and residents can schedule a joint inspection to confirm all defects have been properly addressed.
In this latest enhancement, we have updated the UI for residents to Close the Defect Ticket once the joint inspection has been carried out.
|
| a. The Close Ticket button can be found at the bottom of the Defect Details Page. |
|
|
i-Account New Features
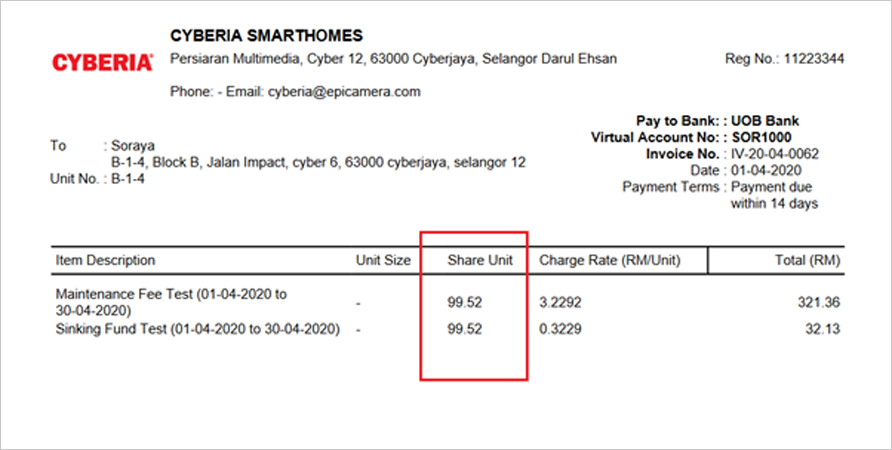
1. Unit Setup Enhancement – Support Decimal Values for Share Unit & Unit Size
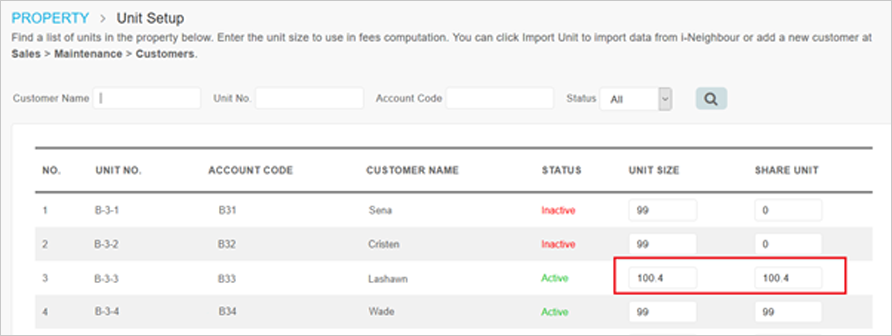
| At the Unit Setup page, Admin can import unit owner data from i-Neighbour. The data fields imported includes Share Unit and Unit Size which can be used in batch invoicing. In April, we have enhanced both i-Neighbour and i-Account to support decimal values for Share Unit and Unit Size. |
 |
 |
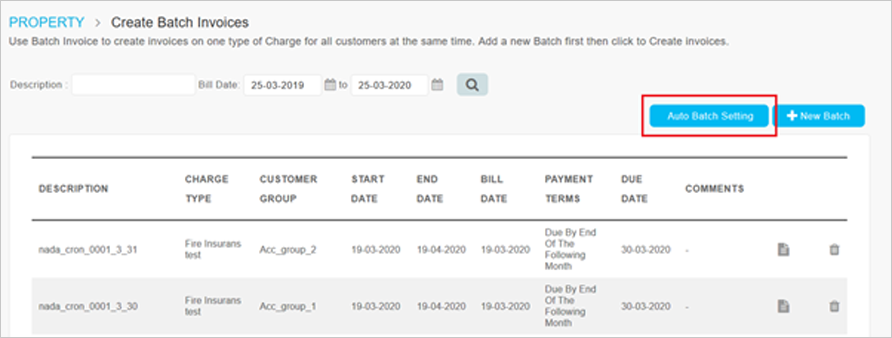
2. New Feature: Auto Batch Setting – Setting for System to Auto Generate Batch Invoice
| We have also enhanced Batch Invoice by adding a function for the system to automatically generate invoices based on users’ predefined setting. Hence, instead of manually creating the batches for monthly charges, you can now use this Auto Batch Setting at Batch Invoice page. More information on how to use this function is as follows: |
- Go to Property > Batch Invoice. Click on the ‘Auto Batch Setting’ button.
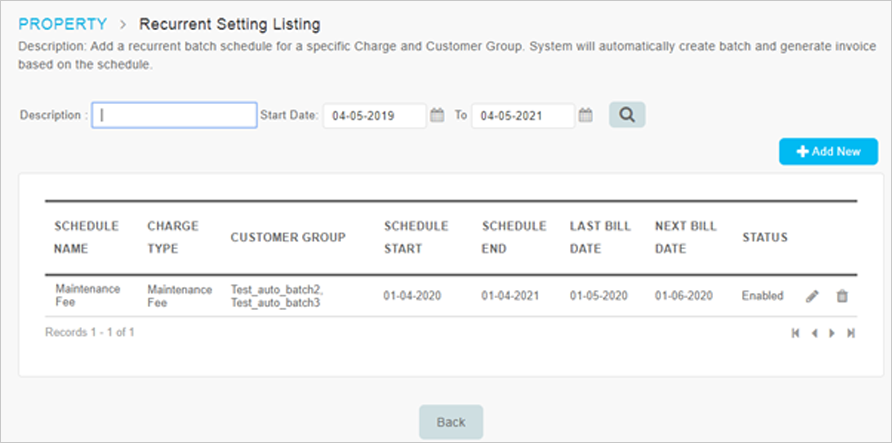
- At the Recurrent Setting Listing page, choose ‘Add New’.
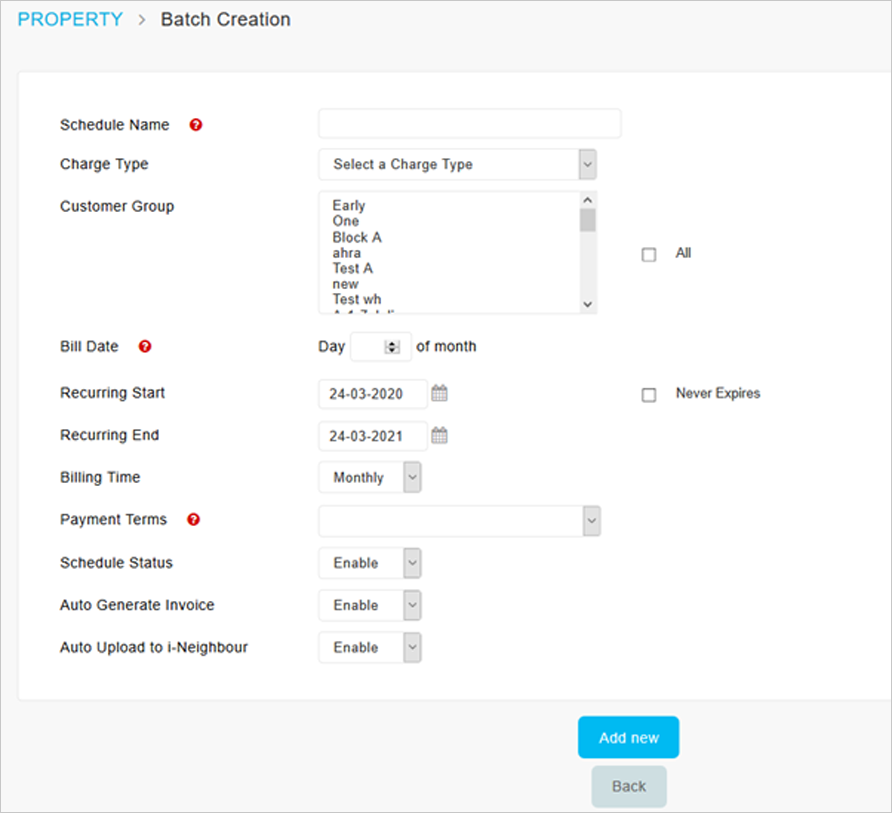
- Configure the options such as ‘Charge Type’, ‘Customer Group’ and etc.
- This setting only supports monthly invoicing frequency, whereby one invoice will be issued for every calendar month. However, you can select whether the system needs to generate the batch every month (Billing Time – Monthly) or generate 3 batches for 3 months at once (Billing Time – Quarter).
- Choose whether to enable ‘Auto Generate Invoice’ and ‘Auto Upload to i-Neighbour’.
- Once configured, click ‘Add New’. On the scheduled date, once the system generates the batch, it will be displayed in the Batch Invoice page.
|
| a. Property > Batch Invoice > Added ‘Auto Batch Setting’ |
 |
| b. Recurrent Setting Listing |
 |
| c. Add New Recurrent Batch Schedule |
 |
| d. Batch Invoice – Auto Generated Batch Invoices |
 |
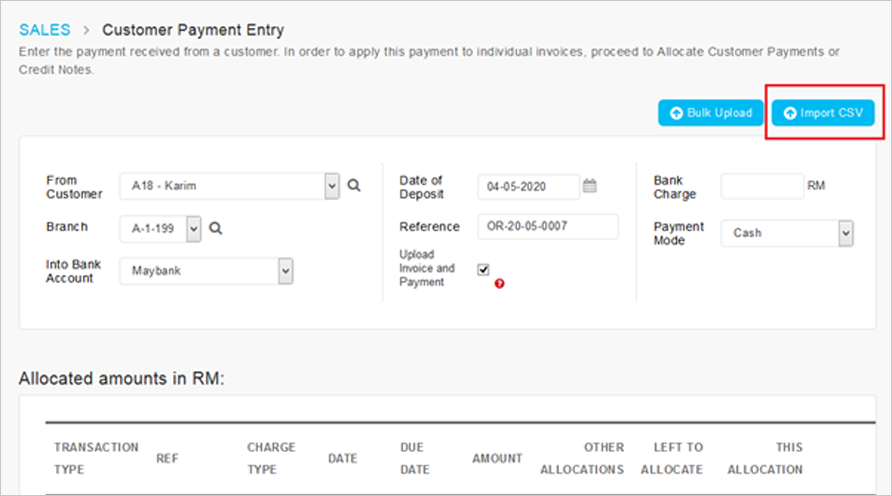
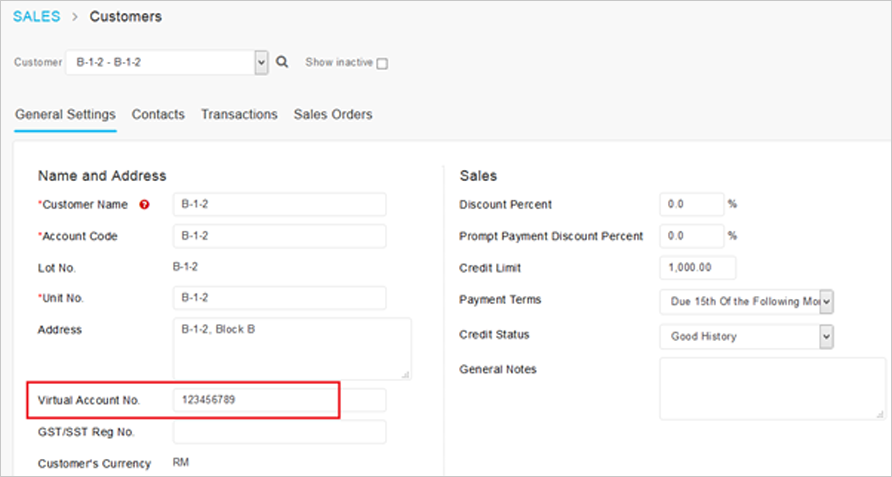
3. New Feature: Import Bank Receipts with CSV File (Using Virtual Bank Account Number)
| At Customer Payment, we have added a function to import receipts from your bank account statement if you are using a service known as Virtual Bank Account Number provided by the bank. Just extract receipt details from your bank statement, fill up the import template we have provided (csv format) and upload the file. System will add payment into the debtor's account by matching the Virtual Account Numbers. The necessary settings and steps are as follows: |
- Before import, ensure that you have already configured each owner's Virtual Account Number. This can be imported from i-Neighbour (Unit Setup) or entered at the Customer page.
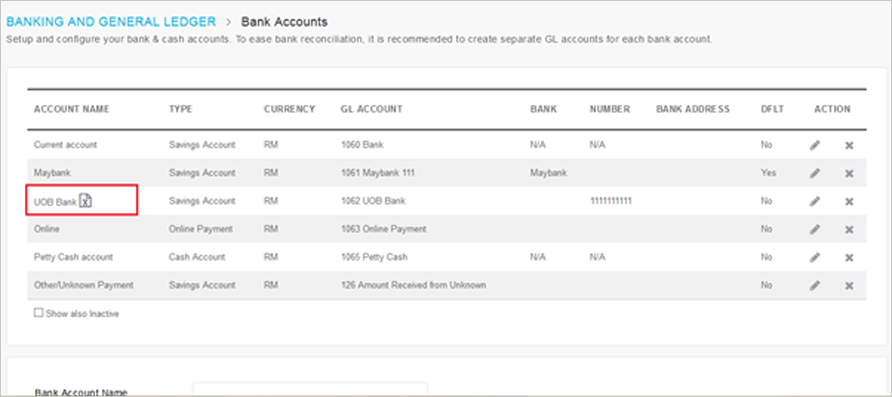
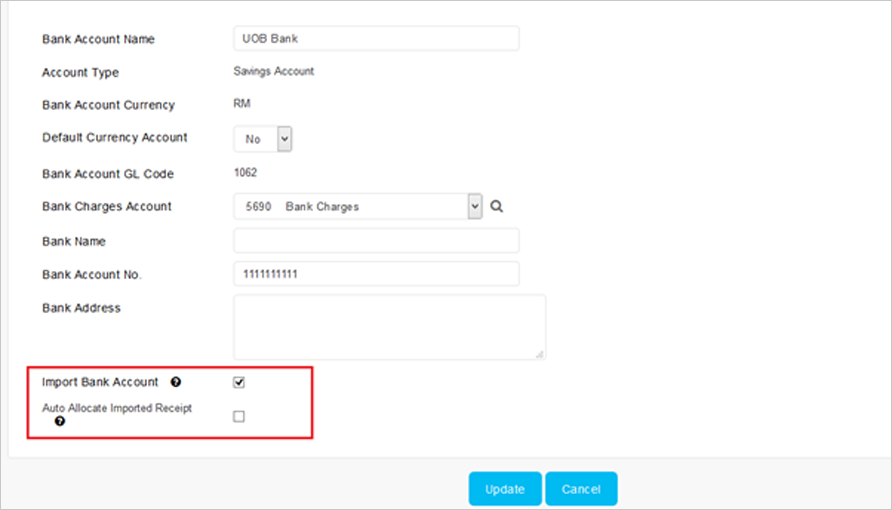
- Additionally, the import bank must be set at Banking and General Ledger > Maintenance > Bank Account.
- Go to Sales > Transactions > Customer Payments > Click ‘Import CSV’ button.
- Download the Import Receipt template (in CSV format).
- Fill in details such as Date, Virtual Account Number, Amount.
- Select whether to ‘Auto Allocate Imported Receipt’. When ticked, the receipt is allocated against the earliest invoices in the system.
- Upload the file.
|
| a. Customer Payment – Added ‘Import CSV’ Button |
 |
| b. Import Bank Receipt CSV |
 |
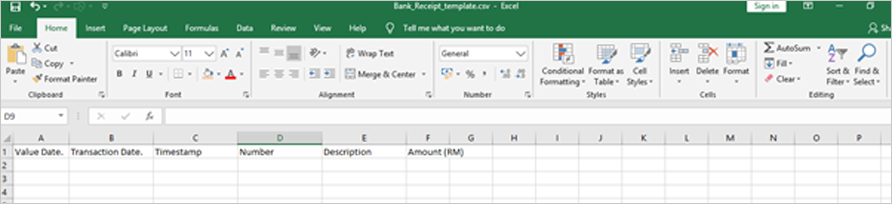
| c. Import Bank Receipt Template (CSV) |
 |
d. Bank Accounts – Added Option for Selection of ‘Import Bank Account’
Admin can select the import bank (tick checkbox) and save the settings for all future imports. |
 |
| |
 |
| e. Customers – Added Virtual Account No. Field |
 |
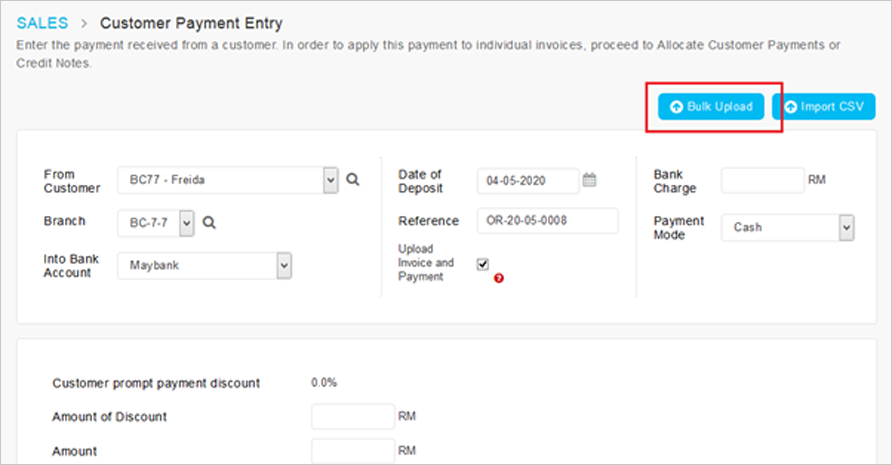
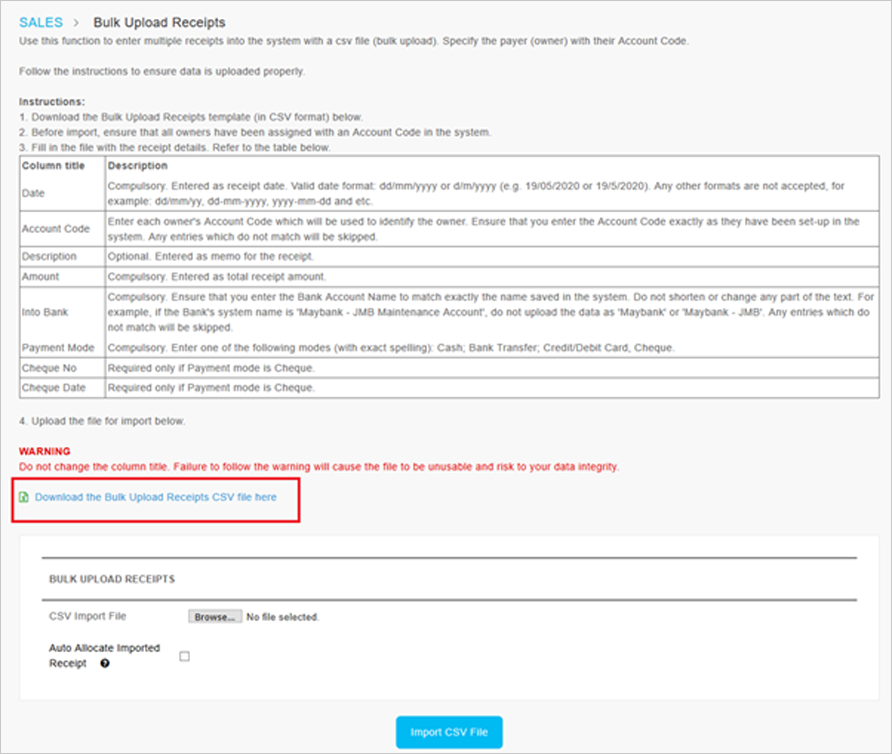
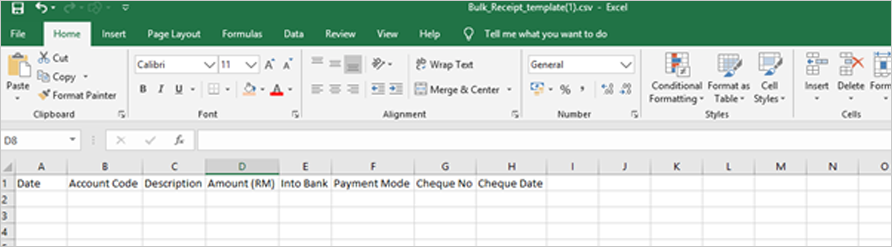
4. New Feature: Bulk Upload Receipts with CSV File (Using Account Code)
| This next update is also for bulk entry of receipts at the Customer Payment page. If one individual/ company is making payment for multiple units at once, you can now enter receipts into the system quickly by uploading a csv file based on our import template. In the import process, each owner/debtor will be identified with their Account Code. Details are as follows: |
- Go to Sales > Transactions > Customer Payments > Click ‘Bulk Upload’ button.
- Download the Import Receipt template (in CSV format).
- Fill in details such as Date, Account Code, Description, Amount, Into Bank and Payment Mode.
- Select whether to ‘Auto Allocate Imported Receipt’. When ticked, the receipt is allocated against the earliest invoices in the system.
- Upload the file.
|
| a. Customer Payment – Added ‘Bulk Upload’ Button |
 |
| b. Bulk Upload Receipts |
 |
| c. Bulk Receipt Template (CSV) |
 |
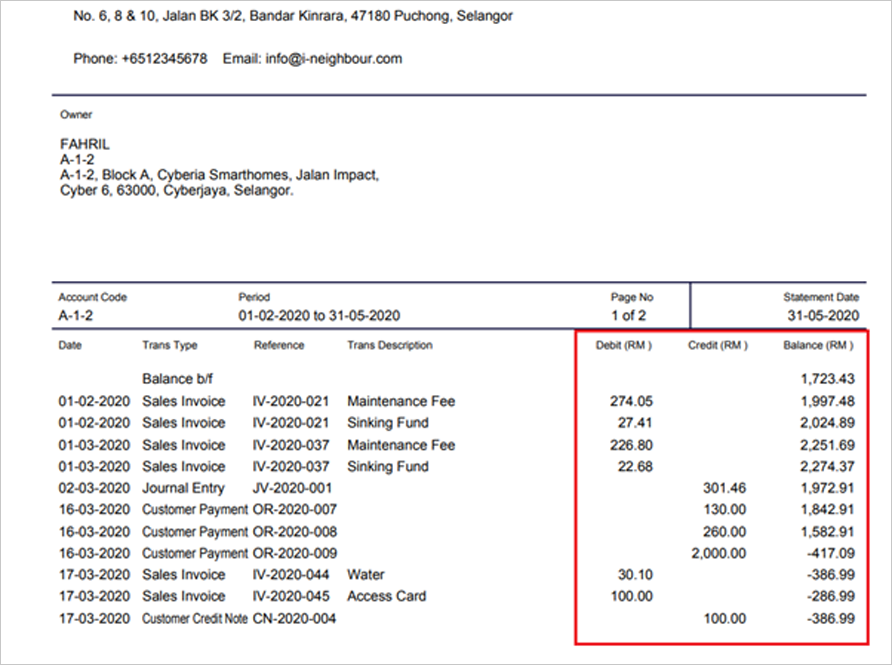
5. Enhancement on Statement of Account
| For the Statement of Account, we’ve updated the report layout and information as follows: Remove Due Date column and add in Credit/Debit column |
- Removed Due Date column
- Added Debit and Credit columns to display Transaction Amount
- Updated Balance column to show Accumulated Balance
|
 |